23 Haziran 2016 Perşembe

Ebru Şallı dan 10 mükemmel maske önerisi

Ebru Şallı dan 10 mükemmel maske önerisi

21 Haziran 2016 Salı

Hamilelikte çocuğu emzirmek mi?

7 Haziran 2016 Salı

Her zaman güzel görünmenin yolları

Kategori: Güzellik
Herkesin bronzlaşma derdine düştüğü bu dönemde beyaz cildinizi nasıl koruyacağım kaygısını taşıyorsanız tavsiyeler buradadır. Yatmadan önce cildinizi bir adet ortadan ikiye bölünmüş limonla ovun ve sabah kalktığınızda yüzünüzü durulayın. Haftada bir kez cildinizi ölü hücrelerden arındırmak için ve cildinize temizlemek için peeling uygulamalısınız. Yoğurdu cildinize sürün ve 20 dakika sonra süt ile durulayın. Bir ölçek limon suyu ve balı karıştırarak cildinize uygulayın. 15 dakika beklettikten sonra durulayın. Ya da kuru bir cilde sahipseniz bir yemek kaşığı balı, yarım yemek kaşığı limon ile karıştırın ve yüzünüze uygulayın. 15 ile 30 dakika arasında bekletin. Ardından az su kullanarak cildinizi ovun ve o şekilde kurumaya bırakın.


Her zaman güzel görünmenin yolları

Cildin üzerindeki ölü hücreler renginizi gölgeli gösterir. Kuru bir cilde sahipseniz salatalığı ezerek suyunu çıkarın ve buna eşit miktarda bal ekleyin. Yüzünüze uyguladıktan 15 dakika sonra durulayın. Yulaf unu, zerdeçal ve bir çay kaşığı limon suyunu macun haline getirin. Yüzünüze uyguladıktan sonra kurumasını bekleyin. Ardından yüzünüzü durulayın. Muzu ezerek yüzünüze maske olarak uygulayın. Üç-dört dakika sonra yüzünüzü durulayın. Papaya ve salatalığı ezin ve karıştırın. Bu karışımı cildinize sürün.10 dakika sonra cildinizi yıkayın. Cildinizin doğal bir şekilde parlamasını istiyorsanız, bir papaya ezin ve yüzünüze sürün. Ardından yüzünüzü yıkamadan az su ile ovun. Çiğ patatesi dilimleyin ve yüzünüze koyun. 10 dakika beklettikten sonra su ile durulayın. İki yemek kaşığı buğday ununa macun kıvamına gelene kadar su ekleyin. Yüzünüze aşağıdan yukarıya masaj yapar gibi bu karışımı sürün. 15 dakika sonra durulayın. Ayrıca bu karışım yağlı cilt temizlenmesinde de etkili olacak. Fakat her şeyden önemlisi cildinize sihirli bir değnek deymediyini ve istediğiniz cilde anında ulaşabilir alamayacağınızı düşünün ve sabırlı olun.


  • lovely
  • 4-04-2014, 14:06
  • 1168
  • 0
  • 2 )
    • 40
    • 1
    • 2
    • 3
    • 4
    • 5

Benzer Konular

1 Nisan 2016 Cuma

Free Shipping Ends May 31st

Click on the image to Expand to full view

Only 7 days remaining for the free shipping promotion. Place your order now, take delivery when you need your fireplace. Our production schedule for the summer and early fall is filling up fast. With the cost of heating on the major increase, many more people are looking to wood as a secondary heat source for there existing or new construcion home. This promotion is valid with all Acucraft Manufactured Wood and Gas Fireplaces.

Happy Burning 

31 Mart 2016 Perşembe

4 Stages of a Fire

In response to many requests from my last post, the purpose of this post is to discuss the 4 different stages of wood burning. We at Acucraft have adopted these standards and this post will differ from the chemical breakdown of wood.

These stages are very important to understand when using an efficient wood burning fireplace or stove to maximize the BTU's per pound of wood. Many people new to efficient fireplaces stay in the creosote stage with wet wood, focus on getting your fire to be in stage 3.

Stage 1 - Start Up Stage
- The start up stage involves warming your fireplace flue and creating draw to begin pulling in the combustion air. We recommend starting with dry kindling and a fire starter, do not use newspaper. Many chimney sweeps will say the majority of creosote build up is caused by newspaper along with a cold flue.

 "Simple Wood Moisture Test" which anyone can do: 
"Add one large piece of wood to the top of an established fire. If it starts to burn on three sides within one minute, it is dry and seasoned and right for burning, If it turns black and starts to burn in about three minutes or more, it is damp. If it turns black and does not start burning until five minutes or more, it is green and wet. If it hisses at any time, the wood is soaked and will not burn until the excess moisture is boiled away."

Stage 2 - Creosote Stage
- Always start with dry seasoned wood, preferably under 20% moisture content. Add the dry split wood above the burning kindling fire. Always ensure there is proper flow for the smoke and heat to exit up the flue. The goal is to get out of this stage, the wood temperature will rise as it begins to burn. The moisture will be evaporating from the wood as it reaches 212 F and all the moisture will be out of the wood between 400 and 414 F. During this stage the wood will be hissing and bubbling on the ends. Keep the damper and combustion controls wide open during this stage, until you see the wood cleanly burning with out grey smoke etc..

Stage 3 - Heating Stage
- Once the wood has burned out the moisture and you have the combustion control dialed in, the flames will take on a slow moving orange flame. Maintain this type of burn for maximum heat and minimal creosote build up on your glass and flue. This stage can be maintained for 6-10 hours between loads of new wood, depending on your wood and your fireplace.


Perfect Looking Flame


"Simple Wood Moisture Test" which anyone can do: 
"Add one large piece of wood to the top of an established fire. If it starts to burn on three sides within one minute, it is dry and seasoned and right for burning, If it turns black and starts to burn in about three minutes or more, it is damp. If it turns black and does not start burning until five minutes or more, it is green and wet. If it hisses at any time, the wood is soaked and will not burn until the excess moisture is boiled away."

Stage 4 - Die Down
- If you are going to let your fire go out in your fireplace, open the damper. During this stage, your flue will be getting colder at the top and when the cold meets with slow moving smoke creosote can occur. By opening your damper during this stage you are able to keep the flue warmer until the fire goes out.

As always, if you have any questions or would like to requests topics for the next blog post, please email them to chris@acucraft.com

Happy Burning.

27 Mart 2016 Pazar

What is the difference between a fireplace and an insert?

There is a lot of confusion about the difference between a fireplace and an insert. The actual definitions vary by region, I will try to explain the main differences between the two categories.


Category I - Fireplaces

A fireplace is a self operating system that is able to burn fuel. A fireplace will have its own chimney flue system. There are two main types of fireplaces:

1. Factory built fireplace - Acucraft manufactures factory built fireplaces that are pre - engineered systems where the chimney system and combustion air inlets along with controls for both are incorporated. The factory built fireplace is set in the home and built around with framing and stone.


The fireplace on the right is a factory built fireplace by Acucraft and the fireplace on the left is the same fireplace with our insulated panel system.


The fireplace installed above  is the completed factory built fireplace. This fireplace has the rustic arched doors with grids.

2. Open hearth fireplace - Open hearth fireplaces are typically built on site by a mason. The firebox is lined with real firebrick. Open Hearth Fireplaces provide alot of ambiance, however, the efficiency is appx -35%. The average open hearth uses very little outside air combustion and appx 300 cubic feet of air per minute is pulled from your home and goes up the chimney flue. Please note: all Acucraft wood burning fireplaces can be operated as an open hearth by simply removing the doors or burning with the doors open, providing your home has adequate make up air.

Open Hearth Fireplace - They will provide some heat for the area around the fireplace, however they are very inefficient and alot of the heated air in your home will go up the flue. Turn up the furnace prior to starting a fire.

Category II - Inserts

Inserts are units that are designed to fit inside an existing fireplace. They are most popular inside the open hearth fireplace because they can help the system burn more efficiently. Custom inserts are very expensive and difficult to design. Many Inserts require a lot of steel around the insert, called flashing, to close off the area between the little insert and the fireplace opening.

Custom Wood Burning Insert

Please note that Acucraft does not design or manufacture fireplace inserts.

We hope this post helped explain the difference between a fireplace and an insert. As always, if you have any questions please call us to further identify the perfect solution for your needs. 763.263.3156 and ask to speak with a selection specialist.

Happy Burning

23 Mart 2016 Çarşamba

Test Fire - Custom Linear Gas Fireplace

Acucraft just finished test firing a large custom linear gas fireplace. Prior to shipping all custom gas fireplaces, we burn and test every fireplace. The below fireplace has a huge 120" wide x 24" high viewing area. The customer wanted a large 12" -18" flame and has propane as the fuel source.

The pictures do not do justice to how awesome the flames look.

Viewing Area is 10' Wide x 2' High


Propane Gas and huge flames from a gas fireplace are difficult to achieve. Propane is heavier than air, Natural Gas is lighter than air. Propane needs to be delivered at 3X the pressure of Natural Gas, which requires much more outside air for combustion to be mixed with the Propane Gas. The addition of more outside air turns the flame blue. Acucraft and our customers desire tall slow moving yellow flames.
Therefor we at Acucraft, Custom designed a long 100+" elevated burner with the gas entering the burner in 3 areas, middle and both ends. This will evenly distribute the Propane. The design included 3 large 200,000 BTU valves, with variable flame height control via remote control.


100" + Custom Propane Burner Pan


Below is a link to a video of the fireplace in action.


The Customer selected recycled glass as the media, which will be installed at the site to hide the burner and more evenly distribute the flame.


The outside combustion air will be distributed to the firebox in the slotted openings, shown above along the front flange. There is  two panes of glass, this will keep the glass cooler to the touch with air transfering between the glass.

This Fireplace along with another large custom fireplace are being shipped to there new home in Indiana.

The fireplaces just keep getting bigger, below is a photo of a  huge gas fireplace we are testing tomorrow. The dimensions on this fireplace are 11' wide and 3' tall = 4,752 square inches of viewing area.


The firebox is completed and the insulated panels are being installed. Tomorrow we burn and test.


If you are interested in learning more on Custom Linear Gas Fireplace, please view the November 4th blog post on The 5 Key Decisions in Designing your Custom Linear Gas Fireplace


 Happy Burning!

20 Mart 2016 Pazar

Whole Home Heating

Acucraft's whole home heating technology is a great way to  maximize your fireplace and its heating potential! With the use of Remote Ducting and the Water Loop, you can heat both your air and your water with just your fireplace! The two options cost very little to install and they offer a huge return. Many wood burning customers who install both options use very little gas or electric to heat their air or water all winter long.

Acucraft's Remote Ducting option aids in the goal of heating your entire home as evenly as possible, with the elimination of cold spots. The Remote Ducting option uses B-Vent pipe to vent heated air to other areas of your home. You can vent to anotherroom on the same floor, upstairs or even below with the use of an in-line blower (this is different from the fireplace blower). You can even connect your Remote Ducting system into your cold air return and use your furnace fan to evenly distribute the heated air throughout your home, eliminating cold spots.


The diagram above shows the remote ducting taking the heat from the fireplace and transfering it to the furnace for distributing heat throughout the home using the existing ducts. Many of our customers have the duct end at the basement ceiling. With an in-line blower in the basement ceiling when you want the heat in the basement just turn on the in line blower.


The Z-MAX Fireplace photo above shows the remote ducting, the 8" duct on the right of the fireplace flue, transferring the heat from the fireplace to the other end of the home. The customer also installed an in line blower with variable speed to control the amount of heat transfered to the other end of the home. The duct can transfer up to 70% of the heat generated by the fireplace. The Z-MAX is capable of 130,000 BTU's an hour, so we are talking about a lot of heat - the average furnace is under a 100,000 BTU's an hour.

The Acucraft Water Loop is a stainless steel loop/ coil that is factory installed into the fireplace that can be used to heat your domestic water and/or your radiant in floor heating systems. The loop is designed to be a supplemental system. A small thermostatically controlled pump is installed that will automatically start circulating the water when your firebox becomes heated, providing supplemental heat for your water.


The above photo shows the Water Loop in one of our see through fireplaces, the loop is located in the center of the firebox.


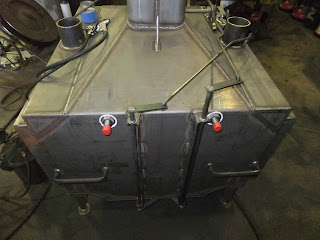
The photo shows the exterior of the fireplace, the water lines connect to the water loop where there are currently the red proctective caps. One line bringing the water in, the other bringing the hot water out.

The remote ducting and the water loop are part of the Acucraft's whole home heating technology. The options are all hidden within your fireplace and with the thermostat control, they turn themselves on and off.

If you have any questions, please contact Acucraft and we can assist with your specific whole home heating plan.

Happy Burning,
Acucraft